Saturday, November 27, 2010

I'm seeing Polka Dots

Here is the before of the chest of drawers

This is an unusual couple of pieces probably from the 60's or 70's.  I didn't get a picture of the dresser before but it is basically the same thing.  The bottom drawers have ridges at the bottom of the drawer to put your fingers and pull the drawer out. 


Random Dots!

As you can see they turned out really cute.  The owner of the store really likes things "funky" and that is what she got.  The top of the larger piece is still wet on top with the Poly.  For the drawers with knobs we painted them white and you can barely find them.


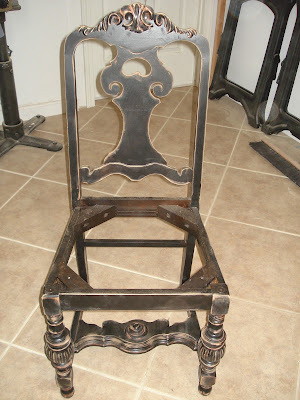
We wanted them to coordinate with a couch we were having reupholstered for the store.  Pictured here.  We had to take the old upholstery off before we could paint it.  It was painted black and then distressed.  Turned out beautiful. 


The couch as you can see is from a little bit different time period for starters.  But it has some beautiful detail as you can see from the first picture.  There is a piece of carving that goes at the top of the back in the center, you will see that in the after picture.


Here is the after 


Delightful!
Bet you were not expecting that!  you can see the black painted wood and the distressing.  Also the top center piece that was not on in the original picture.  You can see the Polka Dot chest in the way back of this picture.


As always I was delighted because the pieces made it into the window of the store!

Treasures Resale Consignment store, Roswell, Ga


Note the black and white chairs she put with it.  She likes these so much she won't even sell them.

If you are in the Roswell, Ga area please stop in and see my work.

Tuesday, November 23, 2010

So off topic a bit

So this is off topic a bit but I wanted to share this great deal with you all.

Christmas is by far my favorite time of year, I love to decorate the entire house in lights and garland and don’t even get me started on our multiple trees! One of my most favorite activities though is sending out holiday cards! I always like to include some great photo highlights of what I have been up to over the past year and I can’t wait to create this year’s cards. Shutterfly makes it so simple that I can’t resist, you just choose an easy template, upload your favorite family photos, edit the text and bingo you’re done! I love the great designs they are offering this year and as a bonus right now - Bloggers get 50 free holiday cards from Shutterfly… sign up at http://bit.ly/sfly2010 . 

Isn’t that fantastic?

Check out some of the great holiday card options at Shutterfly: 

See more holiday photo cards at http://www.shutterfly.com/cards-stationery
 
At Shutterfly, you can also create customized Desk Calendars for 2011! I think this is a great gift option for your friends and families! You could create it with customized photos just for them!


See all of the options for desk calendars at 

I think I definitely might choose to create a few of these to decorate my new place (when I move out of course!) -- the personalized wall art option – turning your photos into real canvas artwork! See more here http://www.shutterfly.com/home-decor/canvas-wall-art

I can't wait to share my Holidays Cards from Shutterfly this year!


Thursday, October 21, 2010

Beautiful Coffee Table

Here we have a rather sad coffee table that a client asked me to re-do and make beautiful and it wasn't that hard to do.

Here is the table when I got it.  It was very well worn.  But it had potential :)


Here is a close up of the detail on the legs and the apron of the piece.

 
Here is the leg after I painted the whole thing black.  It was pretty But.....There was still work to be done.

This is the leg close up after distressing it.  The detail now is much more pronounced but it looks dry and the wood showing through is very light.
 

This is the close up of the leg after I put the colored wax on it.  The wax makes the leg more rich looking and not dry at all.

This is the side view of the finished piece.  Notice the distressing on the side apron was done with a very light touch and only went through the black paint and not the wood stain.


Finish piece was delivered to a very happy client.  Its so much fun to do these interesting pieces.  Everyone has them, there is a never ending supply.


Tuesday, October 12, 2010

My most recent project

My most recent project was for a client.  She had a buffet, and hutch from her mother that she wanted to use.  She also had an oak table with 6 chairs that were not of the same period.  She wanted to use them all together.

By painting them and treating them all to the same finish it brought a cohesive look to all pieces.

Here are the pictures.

Here is the Oak table with the 6 chairs

Here is the buffet definitely not Oak and much older

Here is the Hutch again not Oak and a much older piece.

I should mention that she had a piece of furniture in the next room that she really liked the look of, so we were trying to coordinate with it. 

Here are the after pictures


Here is the table with the six chairs

The buffet

The hutch

I have to say it has been my most challenging project to date.  We painted the pieces off white, then glazed with a medium tan, then put a clear coat over that.We then glazed them all with a custom mixed grey. Over all that I put a clear coat of wax, the horizontal surfaces got two coats of acrylic poly.

The client was very pleased.  She said that the furniture has now been brought into the 21st century and she will be proud to use it for many more years.

Wednesday, October 6, 2010

Zebra Anyone?

Zebra dresser
 I don't have before pictures of  these two pieces.  Let me tell you about them though.  When they came in they were painted in a yellow gold color and the drawers had wallpaper on them.  Not a bad idea but it was old and coming off in spots.  I painted the outsides of the pieces black then painted the drawers white.  After that was dry I added the Zebra stripes.  The knobs were round wood so I painted them black as well. 


Zebra Desk


Picture of the Shop front with the Zebra furniture in the window.
I just love it when my pieces make it into the window.  It means they really like them ;)  I did these over the summer and thought a young tween would think they were cool.  Which they did......  both are sold.  I know one went to a college dorm ( not so tween after all)  not sure where the other one went but they are both sold.  Yay

Thursday, September 30, 2010

Simply Fabulous Old Dining Set

 This group of furniture was donated to the store that I volunteer at.  It has been so long since I blogged that perhaps you have forgotten that I paint furniture for the store called Treasures Resale Consignments.  It is a non profit store so all the profits go to local charities.  A win win.  I can paint all the furniture I want cause there is a never ending supply!!  Sometimes it is truly amazing stuff like the pieces I am about to show you.

First we will start with the chairs
(there were 6 in total)
 
The original Chair
The chair started out being a rather orange color it was the wood with some disturbing orange stain over it.  Was not going to sell that way...


Here is a close up of the top of the chair.  It has some amazing detail as do all the pieces. 
Here you can better see the color I was mentioning.


We painted all of them Black. 


Then I distressed them. Usually I do this with a little hand held power sander. 
This time on the more delicate details I sanded by hand.


Once the sanding was completed we dust it off and put on a colored wax. 
The exposed wood takes on a really nice color from the wax. 

Here is a close up of the bottom of the chair, as I said lots of detail to this piece.

Here is the finished product.  It is still sporting the original mauve velvet seat that it came with.  We figured who ever bought it would like to pick the fabric themselves..
and hey pink and black aren't that bad together, right?

Now for the table here is the base isn't it amazing?  It is truly the most beautiful table base I have ever seen.The process was the same for the table as it was for the chairs. 


Painted black, distressed then waxed with the colored wax.  Here is the detail of the top of the table.

This is the base after is has been distressed.

This is the table and chairs finished.


Now for the piece de resistance!!


Here is the server that goes with the set!!  I have no words for how beautiful this piece is.  
Still it is in the orange stain and won't sell like that AT ALL!!
Here is a close up of the detail of this piece.
Again words do not due it justice if I do say so myself.  Unfortunately people this piece sold before I was even finished with it and the table and chairs sold to a different person within the first week.  
Good things do not last long at this store!!

Tuesday, March 16, 2010

From Old and Shabby to New Shabby Chic

This piece was brought in for me to paint. It is from 1913 seems like I am getting lots of very old furniture in to paint lately. Unfortunately this one had been painted more than once and then the last person put a glaze on top of it, not very well because it was rubbing right off.


It had this amazing mirror with it. The customer took the mirror off before they brought it to me so I was left wondering just where the mirror itself went into this piece. There were little brackets on the back to hold a mirror. I am guessing that the original mirror fit into the piece at the bottom because there is a space where one could rest. The mirror maybe even was curved. That mirror was lost, broken or discolored and the more recent owners just put a mirror on the back. Therefore I painted all the exposed wood so however the new mirror went in all would be covered.


Before

After


Here is the vanity after a fresh coat of paint and some even distressing and then just a bit of colored wax to give it some character. I also suggested crystal knobs for the piece as it had miss matched knobs.


We took something that was very old and shabby and made it more uniformly Shabby Chic!

I'm seeing Checks and Dots and Flowers!!!

This chest was consigned at the shop. A customer bought it and wanted me to paint it. The only instructions were to keep it white and add black and make if Funky. Well that took some thought.


Here it is in progress


Here is the top done


This is the finished piece


I'm seeing checks and dots and flowers!


The Old Secretary

Here is a very old Secretary that the shop got in a few months ago. It was a dark wood then painted red, then painted grey? I know who would do that??


Here is it after we painted it white then put on a colored wax. We decided not to distress it cause of the colors under the white. Both would show through when we sanded down the white. You would see gray then red then the wood. Pretty colorful, but it would not fit into to many peoples home decor.


I think it turned out pretty nice.

Popular Posts